
By a professional chef and kitchen skills trainer with over 15 years of experience in culinary education and field cooking.
It always happens at the worst possible moment. You’re mid-recipe, dinner is almost ready, and you reach into the drawer no can opener. Or maybe you’re camping, the power is out, or you’re deep into prepping a meal for a crowd. Trust me, I’ve been there more than once, both in professional kitchens and out in the field.
Here’s the honest truth: opening a can without a can opener is completely doable, and once you know how, it becomes second nature. I’ve used every method below in real situations not just tested them in a lab. Let me walk you through what actually works, what to avoid, and how to stay safe while doing it.
⚠️ Safety First: These methods involve sharp edges and pointed tools. Children should never attempt these techniques. Adults should proceed with caution, keep sharp edges away from the body, and always work on a stable, flat surface.
Why You Should Know This Skill
Canned food is one of the most reliable emergency food sources you can have. Stock canned foods, dry mixes, and other staples that do not require refrigeration, cooking, water, or special preparation that’s the advice straight from Ready.gov for emergency preparedness. Be sure to include a manual can opener and eating utensils in your emergency kit. But what happens when you forget one, or it breaks?
That’s exactly where this skill matters. Canned food is without a doubt one of the best assets you can have in your survival supplies and yet, without one simple tool, most people would be stuck in a survival situation.
I’ve trained hundreds of home cooks and campers over the years. Knowing even one backup method builds real confidence and resilience in the kitchen and beyond.
The 4 Best Methods to Open a Can Without a Can Opener
Method 1: The Metal Spoon Method (My Personal Favourite)
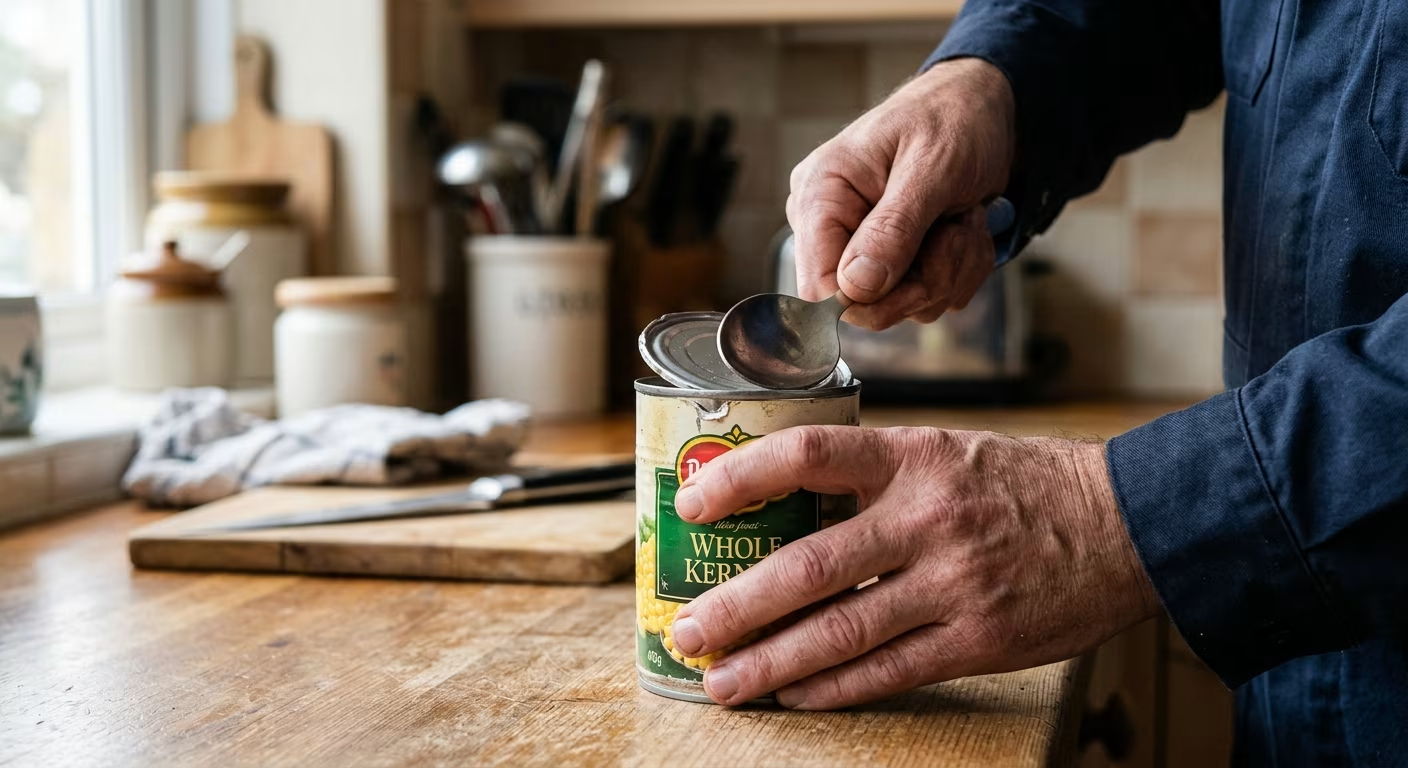
This is the method I always teach first because the spoon method is somewhat unusual, but it seemed to be the safest, since you’re not handling anything sharp. All you need is a sturdy metal spoon not plastic, which will snap under pressure.
Here’s exactly how to do it:
- Place the can on a stable, flat surface a countertop or table.
- Get a good grip on the bowl of the spoon not the handle. Hold the bowl of the spoon in your palm, gripping it with your four fingers.
- Firmly and methodically, rub the edge of the spoon back and forth along the can edge (be vigorous). Keep rubbing until the metal thins and, in turn, creates a small hole.
- Press the spoon into the hole. Pry the top to open more by pulling up with the spoon around the edges of the can. Continue this prying around the perimeter until the top can be fully peeled back.
My tip from experience: Go slow and steady at first to find the groove on the inner edge of the lid that’s your target line. Once you break through the first point, the rest gets easier. I once opened a can of black beans this way in about 4 minutes on a camping trip. It’s not fast, but it’s safe and reliable.
A plastic spoon is too weak and will not work don’t even try it. Go straight for the metal.
✅ Best for: Home kitchen emergencies, camping trips, everyday situations where you simply misplaced the can opener.
Method 2: Using a Pocket Knife or Chef’s Knife
This is the classic method most experienced cooks and outdoorspeople know. Another option for how to open cans without a can opener is to use a knife. A chef’s knife without a bolster (the thick metal part between the blade and knife), such as a santoku knife, is ideal for this task. You can also use a pocket knife or cleaver; however, a butter knife will not work.
Using a pocket knife (the puncture method):
- Place the tip of the knife on the inner lip of the can, and then tap the pommel with your other hand to puncture the lid.
- Then plunge the knife into the can, working the blade along the edge to slice it open.
- Slide the knife over one or two centimeters and repeat the steps listed above to puncture a second hole in the lid. Continue using the same method to puncture holes around the entire perimeter of the lid.
- After working your way around the entire perimeter of the can, the lid should be loose enough to easily pry open with the knife. Put the knife’s tip into one of the holes you made, and carefully press on the handle to pull up the lid.
Using a chef’s knife (the heel method):
To open a can with a chef’s knife, place the heel of the knife along the inner edge of the lid, use the other hand to keep the can steady, and carefully but firmly use the corner of the knife to break through the surface. To remove the entire lid, continue slowly moving the heel along the edge until you can pry the lid open.
⚠️ Critical safety rule: Protect your fingers and hands and make sure that the sharp edge of the blade is always facing away from your body to prevent injury.
I’ve used the chef’s knife heel method many times in professional kitchens when the can opener was in use or missing. It does take confidence, but it works a lot better than you might think. You have to be careful with the initial puncture, but it doesn’t take much force to pierce the lid.
✅ Best for: Experienced adults comfortable with knife handling, outdoor use, or when the spoon method is taking too long.
Method 3: The Concrete or Rough Surface Method
This one sounds unconventional and it is. But it genuinely works, and I’ve personally used it while camping when I forgot all utensils entirely.
You can open a can by rubbing the lid against a rough surface until you wear away the seal. Here’s the step-by-step:
- Place the can on concrete or a rough rock, upside down.
- In a scrubbing motion, rub the can back and forth; friction will eventually eat away at the metal.
- Stop when you see moisture on the surface or lid; if you continue, the can will completely wear out and the food will spill out.
- Pry the can open with either a pocket knife or anything hard and thin enough to fit between the lid and can’s edge.
From my experience: This method works faster on coarser surfaces like raw concrete or a flat rock. Smooth pavement takes much longer. Watch carefully for the moisture that’s your cue to stop. I’ve seen people go too far and lose half their beans to the ground!
It works much faster than you might think but could contaminate your food so always wipe down the rim of the can before eating, and check that no metal shavings have fallen inside.
✅ Best for: Outdoor and camping emergencies where no tools are available at all.
Method 4: Flat Screwdriver or Similar Tool (Puncture & Pry)
Don’t overlook what you might have in a toolbox or camping kit. This method of opening a can without a can opener is rather intuitive. All you need is an object such as a pocket knife, kitchen knife, screwdriver, metal file, or similarly shaped tool combined with a little bit of muscle.
- Position the flat tip of the screwdriver on the inner lip of the can lid.
- If you have a hammer or other tool you can use to baton the top of your tool of choice, it can make this even easier.
- Work the tip around the edge, puncturing at intervals.
- Once enough holes are made, pry the lid up and fold it back carefully.
Just take care to choose a clean tool that won’t deposit dirt or dust into the contents of the can, and avoid cutting yourself on any sharp can edges.
✅ Best for: Power outages at home, garage or workshop settings, anywhere you have basic hand tools.
Quick Comparison: All 4 Methods at a Glance
| Method | Tools Needed | Difficulty | Safety Level | Speed |
|---|---|---|---|---|
| Metal Spoon | Metal spoon | Easy | ⭐⭐⭐⭐⭐ Safest | Slow (3 6 min) |
| Chef’s / Pocket Knife | Any sturdy knife | Moderate | ⭐⭐⭐ Use caution | Moderate (2 4 min) |
| Concrete / Rock | Rough surface + thin tool | Easy | ⭐⭐⭐ Watch for spills | Moderate (2 5 min) |
| Screwdriver / Tool | Flat screwdriver | Easy Moderate | ⭐⭐⭐ Keep clean | Moderate (3 5 min) |
Important Safety Tips (Don’t Skip This Section)
- Always work on a stable surface. Begin by placing the can on a flat and stable surface where it isn’t going to slide around or slip as you are working.
- The lid edges are sharp. The edges of a can lid are sharp, even when opened with a manual can opener; they may be even sharper when non-standard tools are used.
- Watch out for liquid spray. Getting an eyeful of liquid while prying a can open is a real risk keep your face away from the top of the can as you work.
- Clean the rim after opening. Especially after the concrete method, wipe the lip of the can before eating directly from it.
- Children should never do this. Children should not try these methods, and adults should try them with plenty of caution.
When You’re Done Food Safety After Opening
Once the can is open, food safety still matters especially in emergencies. Commercially canned food may be eaten out of the can without warming. However, always inspect what’s inside first.
Commercially canned foods are safe to eat after long periods of storage unless they are bulging, leaking, or badly rusted. If the can looks fine before opening and the contents smell normal, you’re good to go.
For long-term storage, certain storage conditions can enhance the shelf life of canned or dried foods. The ideal location is a cool, dry, dark place. The best temperature is 40°F (4°C) to 70°F (21°C).
Canned food items are typically good for two to five years high acidity foods such as tomato sauce have a shorter shelf life, while low acidity foods will last longer.
Pro Tips From the Field
Over my years working in professional kitchens and teaching cooking skills, here are a few things I’ve learned that nobody tells you upfront:
- Buy pull-tab cans for emergencies. They’re easier to store and require no tools. Typically, opening a can with a pull top is just a matter of pulling up on the ring using your thumb, while stabilizing the can with your other hand.
- Keep a manual can opener in your emergency kit. Stock canned foods and other staples that do not require refrigeration. Be sure to include a manual can opener and eating utensils.
- Practice before you need to. Try to master one or two of these techniques before you’re in a real emergency. The spoon method is the best one to start with.
- Rotate your canned stock. Date cans as soon as you bring them home from the store so you know which ones should be used first. Place new cans behind older ones when stocking shelves and cupboards.
Frequently Asked Questions
Can I use scissors to open a can?
Standard scissors are generally not strong enough and are dangerous to use this way. Stick to the four methods above for safer, more effective results.
What’s the absolute safest method?
The metal spoon method. It’s slower but involves no exposed blades and carries the lowest risk of cutting yourself.
Will rubbing a can on concrete contaminate my food?
You can open a can by rubbing the lid against a rough surface until you wear away the seal. It works much faster than you might think but could contaminate your food. Always wipe the rim clean and check the inside for metal particles before eating.
How long does canned food last?
Canned goods can typically last around two years when stored properly, though many last longer depending on the contents and storage conditions.
Is it safe to eat canned food in an emergency?
Yes commercially canned food may be eaten out of the can without warming. Just make sure the can isn’t bulging, rusted, or leaking.
Final Thoughts
Knowing how to open a can without a can opener is one of those practical life skills that seems minor until the moment you actually need it. Whether your opener breaks mid-cooking, you’re stuck outdoors, or a power outage leaves you relying on your pantry, these four methods will get you fed.
Start with the spoon method it’s the safest and most approachable. Once you’re comfortable, learn the knife method as your backup. Practice them once or twice before you’re in a real bind, and you’ll never feel helpless in front of a can again.
While opening a can without a can opener is more challenging than using a power-assisted can opener, it is certainly doable with some time, patience, and muscle.
Stay prepared, stay safe and keep a manual can opener somewhere you’ll actually remember to find it.
References
- Food Safety for Emergencies Ready.gov (U.S. Department of Homeland Security). Accessed June 2026.
- Food Safety in a Disaster or Emergency FoodSafety.gov (U.S. Department of Health & Human Services). Last updated September 2023.
- Preparing an Emergency Food Supply, Long Term Food Storage University of Georgia Extension (UGA FACS). Accessed June 2026.
- Emergency Food Loma Linda University. Accessed June 2026.
- Four Basic Ways to Open a Can Without a Can Opener or Specialized Tools The Prepared. Published March 3, 2021.