Microwave Corn on the Cob in the Husk: The Fastest Path to Perfect Summer Corn
If you have ever stood sweating over a pot of boiling water on a hot summer day just to cook a couple of ears of corn, you already know there has to be a better way. The good news? There is — and it takes less than five minutes. Cooking corn on the cob in the microwave while leaving the husk fully intact is one of the most underrated kitchen shortcuts you will ever try. The result is tender, juicy, naturally sweet corn that slides effortlessly out of its husk, completely free of those stubborn silky strands that cling to every kernel when you shuck it the traditional way.
This guide walks you through everything you need to know — from picking the best ears at the store, to cooking times, safe handling, creative toppings, and even the nutritional value hiding inside every kernel.
Why Cook Corn in the Husk? The Science Behind It
The outer green husk of a corn cob is not just packaging — it is a natural steam chamber. When you place an unshucked ear of corn in the microwave, the moisture already trapped inside the husk layers converts to steam as the appliance heats the food from the inside out. This steam circulates around the kernels, cooking them gently and evenly without drying them out.
The result is corn that tastes noticeably different from boiled corn: sweeter, more concentrated in flavor, and significantly juicier. Boiling corn in water can leach out water-soluble nutrients and natural sugars into the cooking liquid, which gets poured down the drain. With the microwave-and-husk method, everything stays locked inside the cob where it belongs.
- No pre-soaking needed — the husk retains all the moisture the corn already contains
- No large pot required — saving both water and cleanup time
- Silk comes off effortlessly — the steam loosens the silk strands so they slide off with the husk after cooking
- Even cooking — microwave energy combined with steam heat penetrates the entire cob uniformly
- Healthier preparation — no need for added fats or oils during the cooking process itself
How to Pick the Best Corn at the Market
No cooking method can rescue a bad ear of corn. Before you even reach for the microwave button, your success starts at the grocery store or farmers’ market. Here is what to look for when selecting ears for this method:
- Husk color: Choose ears with bright, vivid green husks that feel slightly cool and slightly damp to the touch. Yellowing or papery husks are a sign the corn was harvested days ago.
- Husk tightness: The husk should wrap snugly around the entire cob. Loose, puffed-out husks often indicate shriveled kernels underneath.
- Silk appearance: Look for golden-brown silk at the tip — not black, dried-out, or slimy silk, which signals age or damage.
- Feel through the husk: Gently press the cob from top to bottom through the husk. You want to feel full, plump, and evenly packed rows of kernels all the way to the tip.
- Stem end: A freshly cut, moist stem end is a good sign of freshness. A dried or darkened base suggests the corn has been sitting too long.
Fresh sweet corn is at its very best immediately after harvest, when natural sugars are at their peak. If you cannot cook it right away, store unshucked ears in the refrigerator to slow the conversion of sugars into starches.
Step-by-Step: How to Microwave Corn in the Husk
The beauty of this method is its simplicity. There are only three real steps: place, cook, and shuck. Here is how to do each one correctly:
Step 1 — Prepare the Corn (Minimal Work Required)
Do not shuck the corn. Leave the husk completely intact. If there are any obviously dirty or wilted outermost leaves, you can peel those off, but the bulk of the husk should remain in place. You may also trim any excess dried silk sticking out from the top and cut a thin slice from the stalk end to neaten things up — but neither of these is strictly necessary.
Step 2 — Arrange in the Microwave
Place the unshucked ears directly on the microwave-safe turntable plate or on a microwave-safe dish in a single layer. Do not stack them. If you are cooking more than four ears at once, it is better to work in batches to ensure even cooking throughout each cob.
Step 3 — Cook on Full Power
Microwave on high (100% power). Use the timing guide in the table below as your starting point. Once done, check that the corn is fully cooked by carefully peeling back a small portion of the husk to peek at the kernels, or by verifying an internal temperature of around 160–170°F (71–77°C).
Step 4 — Rest Before Handling
This is a step that many people skip and then regret. After the microwave stops, leave the corn inside for at least 3–5 minutes before touching it. The exterior husk may feel only warm, but the inside of the cob retains intense heat. Use oven mitts or a folded kitchen towel when picking up the ears.
Step 5 — Shuck and Serve
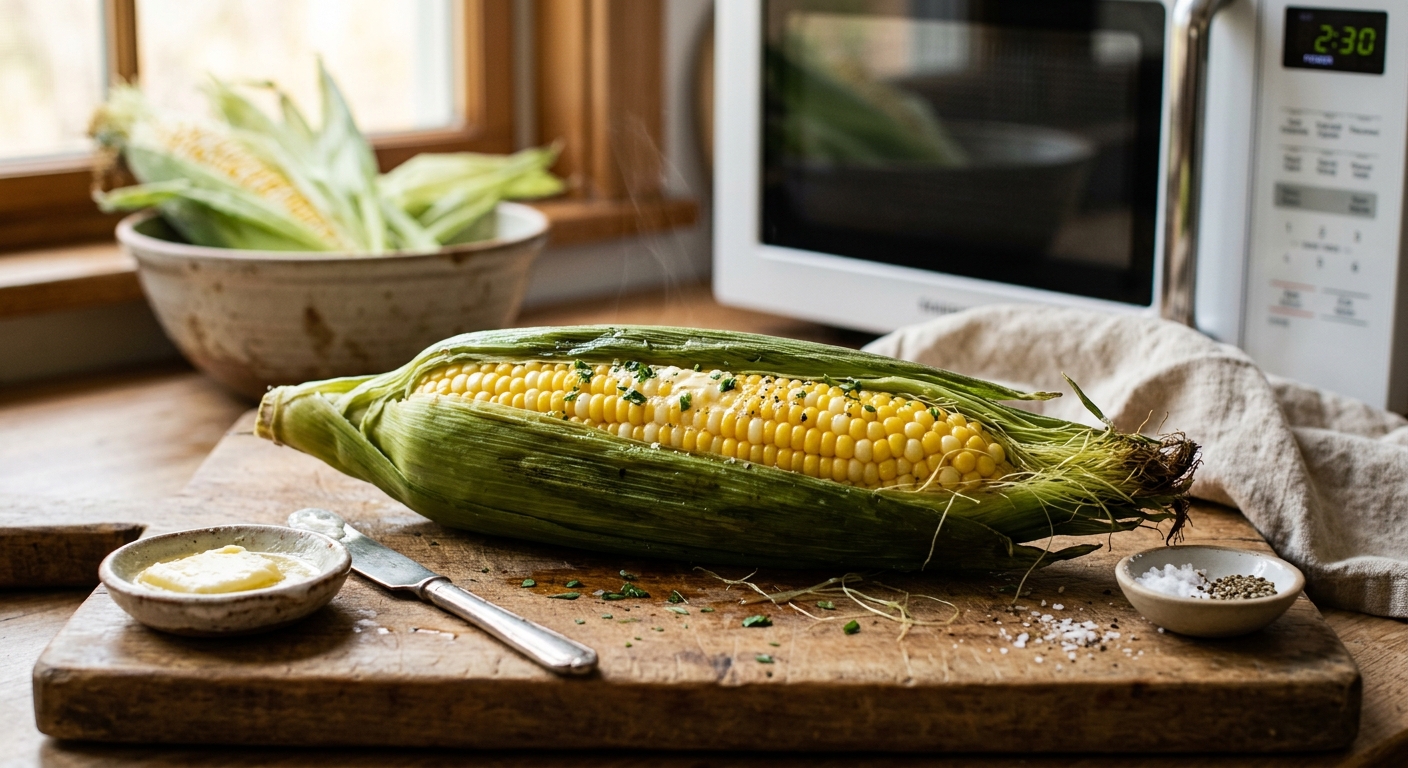
Place the hot ear on a cutting board. Using a sharp knife, cut cleanly through the bottom of the cob about half an inch above where the stalk meets the first row of kernels. Then, holding the tassel end firmly with a kitchen towel, squeeze gently from the tip toward the cut end. The cob will slide out cleanly, leaving the husk and silk behind in one neat bundle — no sticky silk strands clinging to the kernels.
Microwave Corn Timing Reference Chart
Cooking times can vary depending on your microwave’s wattage and the size of the ears. The figures below are a general guide for a standard 1,000–1,200 watt microwave operating at full power:
| Number of Ears | Starting Cook Time | Add if Needed |
|---|---|---|
| 1 ear | 3–4 minutes | +1 minute increments |
| 2 ears | 5–6 minutes | +1 minute increments |
| 3 ears | 7–8 minutes | +1 minute increments |
| 4 ears | 9–10 minutes | +1 minute increments |
Important note on wattage: Lower-wattage microwaves (700–800 watts) will need additional time. Higher-wattage models (1,400+ watts) may cook faster. Always start with the minimum time and add 30-second increments as needed rather than overcooking. If you want firmer, crisper kernels, lean toward the lower end of the range. For softer, more tender corn, add the extra minute.
Nutritional Value of Corn on the Cob
Beyond being a delicious summer staple, corn on the cob brings meaningful nutritional value to the table. According to data referenced by the Mayo Clinic Health System, corn has many health benefits — it consists primarily of insoluble fiber, making it a low-glycemic index food that is digested slowly and does not cause an unhealthy spike in blood sugar, and it also contains many B vitamins as well as essential minerals including zinc, magnesium, copper, iron, and manganese.
On the caloric side, corn on the cob is primarily a carbohydrate-rich food, providing dietary fiber, vitamins such as B1 (thiamine) and C, as well as minerals like magnesium and phosphorus. One medium ear (~90g) contains approximately 77 calories, 17g of carbohydrates, 2g of protein, and 2g of dietary fiber.
Corn is also a good source of antioxidants like lutein and zeaxanthin, which promote eye health. Additionally, corn is naturally gluten-free, making corn and corn products a great option for those with celiac disease or gluten sensitivity.
From a fiber standpoint, the fiber in corn may provide additional health benefits — dietary fiber intake has been linked to a lower risk of several diseases, including cardiovascular disease, type 2 diabetes, and some cancers, and eating enough fiber also promotes healthy digestion and may protect against gut issues.
One practical advantage of microwaving corn in the husk versus boiling it is nutrient retention. Steaming vegetables — which is essentially what this method does — is widely regarded as one of the most health-preserving ways to cook them, as there is no water bath to carry away vitamins.
Creative Topping Ideas Beyond Butter and Salt
Plain buttered corn is a classic for a reason — but once you master the base method, why not experiment? Here are some topping combinations to try:
- Classic Summer: Unsalted butter, flaky sea salt, cracked black pepper
- Street Corn Style: Mayonnaise or sour cream, cotija cheese crumbles, chili powder, fresh lime juice
- Mediterranean Twist: Olive oil, crumbled feta, dried oregano, lemon zest
- Spicy Kick: Sriracha butter, garlic powder, smoked paprika
- Herb Garden: Herbed butter (chives, parsley, dill), light salt
- Asian-Inspired: Sesame oil, soy sauce glaze, toasted sesame seeds, scallions
- Healthier Option: Olive oil drizzle, lime juice, and a pinch of cumin — no butter needed
If you prefer a bit of char on your corn, microwave it first using this in-husk method and then finish the shucked ear on a hot grill or under the broiler for 2–3 minutes for a lightly caramelized exterior without losing the juicy interior.
Storage and Make-Ahead Tips
If you are cooking corn ahead of time or have leftover cooked ears, here is how to handle them properly:
- Refrigeration: Once cooled to room temperature, shucked cooked corn can be wrapped in plastic or stored in an airtight container and kept in the refrigerator for up to 4 days.
- Reheating: To reheat, wrap the cob in a damp paper towel and microwave on high for 1–2 minutes. This keeps the moisture locked in and prevents the kernels from drying out.
- Freezing (uncooked): You can store uncooked corn still in the husk in the freezer for longer-term use, though it is best consumed fresh for peak flavor.
- Kernels only: Slice cooked kernels off the cob and refrigerate in a sealed container. They keep for up to 4 days and are excellent in salads, salsas, grain bowls, and soups.
Troubleshooting Common Issues
Even with such a simple method, a few things can occasionally go sideways. Here is how to handle the most common problems:
- Kernels are too chewy or hard: The corn was undercooked or the microwave wattage is lower than expected. Add cooking time in 30-second intervals until tender.
- Kernels are mushy: Overcooked. Reduce time on subsequent attempts and stay within the recommended ranges in the chart above.
- Husk is difficult to remove: The bottom cut may not have been deep enough. Make sure the knife cut goes through the entire base of the cob, clearing all attachment points for the husk.
- Uneven cooking: If cooking multiple ears, flip them halfway through and rearrange to ensure the microwave’s energy is distributed more evenly.
- Condensation on the turntable: This is completely normal as steam escapes. Wipe the tray dry after cooking before placing anything else inside the microwave.
Frequently Asked Questions
Can I microwave corn that has already been shucked?
Yes, though the results are slightly different. Without the natural steam chamber of the husk, the corn can dry out more easily. To compensate, wrap each shucked ear tightly in a damp paper towel before microwaving. Cook for about 3–4 minutes per ear. The damp towel mimics the steaming effect of the husk, though the flavour may not be quite as concentrated.
Do I need to add any water before microwaving?
No. The corn’s own moisture content is sufficient. Adding water is unnecessary and could lead to uneven steaming or make the husk soggy.
Is it safe to microwave corn in its husk?
Yes, it is safe. The husk does not contain any metallic elements and is microwave-safe. However, be aware that steam can build up inside the husk layers. Always use oven mitts or a towel when handling freshly microwaved corn, and allow it to rest for a few minutes before shucking.
How do I know when the corn is fully cooked?
The safest check is to insert an instant-read thermometer through the husk into a kernel — you are looking for an internal temperature of 160–170°F (71–77°C). Alternatively, peel back a small section of the husk and press a kernel with your fingernail. If it gives easily and releases a small amount of milky juice, it is done.
Can I cook more than four ears at once?
Most household microwaves are best suited to handling up to four ears at a time in a single layer. Cooking more than this leads to uneven results as the microwave’s energy cannot penetrate the entire batch evenly. For larger quantities, work in batches and keep finished ears warm wrapped in a clean kitchen towel.
Does this method work with frozen corn on the cob?
It can, but the timing will differ significantly. Frozen ears need to be thawed first or cooked at extended times to compensate. Start with 6–8 minutes for one ear and adjust upward. The husk-in method, however, works best with fresh corn.
Final Thoughts
Microwaving corn on the cob in its husk is one of those cooking revelations that feels almost too simple to be true — until you try it and immediately wonder why you were ever doing it any other way. It is faster than boiling, easier than grilling, requires zero special equipment, and produces corn that is arguably more flavorful and tender than almost any other preparation method. The natural husk does all the heavy lifting, acting as both a steamer and a built-in wrapper that practically removes itself once the cooking is done.
Whether you are feeding a crowd on a summer evening or just want a quick and wholesome side dish on a busy weeknight, this method deserves a permanent place in your culinary toolkit. Pick the freshest ears you can find, follow the timing guidelines, respect the resting period, and you will have perfect corn every single time.
References
- Corn: A Versatile, Nutrition Choice — Mayo Clinic Health System / Caitlin Terpstra, RD. 2021-08-05. https://www.mayoclinichealthsystem.org/hometown-health/speaking-of-health/corn-a-versatile-nutrition-choice
- Is Corn Good for You? — Cleveland Clinic. 2023-08-03. https://health.clevelandclinic.org/benefits-of-corn
- Is Corn Good for You? Nutrition Facts and More — Healthline. 2026-03-23. https://www.healthline.com/nutrition/is-corn-good-for-you
- USDA FoodData Central — U.S. Department of Agriculture, Agricultural Research Service. https://fdc.nal.usda.gov/
- Corn on the Cob Nutrition Facts — SnapCalorie (data sourced from USDA FoodData Central). 2026-03-07. https://www.snapcalorie.com/nutrition/corn_on_the_cobb_nutrition.html